|
|
Assembling CCD ImagesWebsite archive 1995-2013 |
Victoria Centre is part of the national Royal Astronomical Society of Canada, which is dedicated to bringing information about astronomy to the general public. |
|
|
|
|
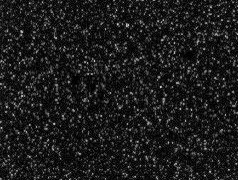
HOW TO ASSEMBLE CCD IMAGES from raw exposures by Jan Wisniewski, Victoria RASC Centre This short article outlines basic steps involved in creating a color CCD image. Any raw astronomical image is usually considerably affected by noise and vignetting as well as sky background brightness. However, unlike with traditional film, those obscuring factors can be easily remedied in electronic image, revealing the true splendor of faint objects. So, how does it happen? Examples below show process of turning raw images of Crab Nebula into its true color portrait. All the frames were taken with Cookbook 245 CCD camera and Celestron Ultima 8-inch SCT f6.3 and processed using Richard Berry's software (http://wvi.com/~rberry/cookbook.htm). 1. Raw image Typical exposures of the faint object (in this case a 4 minute autoguided exposure of Crab Nebula) usually show it only faintly - left image below displays an original frame. When such image is scrutinazed, it turns to be peppered with bright pixels - as obvious in the right image which brightness was gamma-log scaled. ----original raw image - --------- -- - gamma-log scaled image
Dominant source of this noise is a so-called "dark current" which represents signal appearing to various extend on each pixel without any light. It will accumulate in a complete darkness and it intensity increases with the lenght of exposure as well as the temperature of the detector. That is why cooling CCD chip to -25�C or -30�C enables long time exposures - at room temperature "dark current" will saturate many pixels in a few seconds! 2. Dark current removal So-called "dark frame" (representing image taken with CCD detector not exposed to light) is used to remove "dark current" from the raw image. It is advisable to accumulate a set of about 10 dark frames (all exposed for the same time as raw images and at the same temperature of detector) and then avarage them. During dark frame correction, value (brightness) of each individual pixel of that master "dark frame" is subtracted from the value of the same pixel of the "raw image". ----- ----- raw image - dark frame = dark current-corrected image
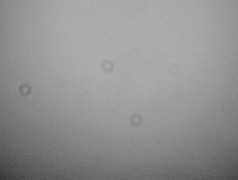
(gamma-log scaled frames are presented above for clarity - in reality this operation is performed using unscaled frames) 3. Flat field correction Vignetting, shadows cast by dust particles and uneven sensitivity of different pixels are all corrected next with the use of a so-called "flat field"."Flat field" is assembled from a set of images of the even bright background (e.g. twilight sky) taken with exposures short enough so that average pixel values will approximately reach half of the maximum. Then a set of dark frames of same duration is accumulated. After averaging each set , dark image is subtracted from a bright frame. Resulting master "flat field" maps response of each individual pixel to the identical light signal. Because of the effect of vignetting, new master "flat frame" has to be made each time camera is repositioned on the telescope. Then value of each pixel of the "dark current-corected image" is then divided by the relative brightness of the corresponding pixel of the "flat field" (that is an actual value of that particular pixel divided by a mean value of all the pixels in the master "flat field"). Resulting "flat field-corrected image" has even brigtness of sky background and no artifacts caused by dust present on the optical surfaces. dark frame corrected image � flat field = flat field-corrected image
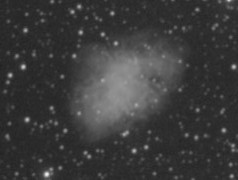
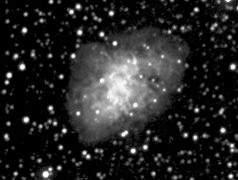
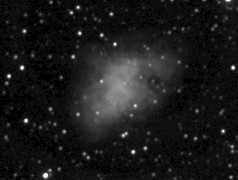
(gamma-log scaled image frames and linear scaled flat frame are presented above for clarity - in reality this operation is performed using unscaled frames) 4. Averaging multiple frames Image corrected as above still contains considerable "noise". To minimize its effects, multiple images of the object need to be averaged. First, each raw image is corrected using dark and flat frames. Corrected images are then aligned (or "tracked") using one or more field stars as markers. Next, in a process sometimes referred to as "stacking", composite image is formed, with each of its pixels assigned value equal to the average brightness of corresponding pixels from all individual images. To see the difference on examples shown below, you may need to turn up you minitor's brightness control! ---------------------single corrected images ---------track & stack image assembled from 10 frames
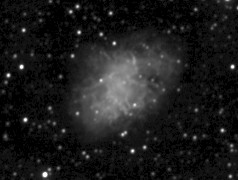
(images were gamma-log scaled before tracking & stacking) 5. Brightness scaling Averaging multiple images greatly improves signal-to-noise ratio. To take a full advantage of it, however, it is important to scale the brightness of individual corrected images prior to "stacking" them. This improves sensitivity and limits rounding-up of close but different pixels values to the same integer value after averaging. Brightness scaling is also used to change brightness and contrast of a final image. The simplest procedure called linear scaling multiplies value of each pixel by a same coefficient. Non-linear scaling (such as logarithmic, gamma-log or expotential) will increase pixel value according to a particular function. Histogram shaping functions will redistribute pixel values across full brigtness range. Different scaling procedures can be combined, too. averaged image (gamma-log scaled during stacking) -- ---same image futher histogram & linear scaled----
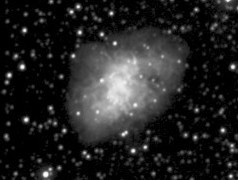
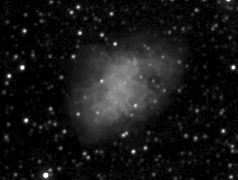
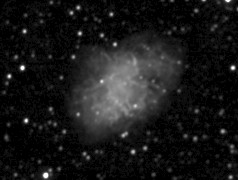
6. Sharpening Unsharp masking is the most frequently used procedure to enhance details obscured by unsteady seeing. In general, it increases contrast of small scale features by subtracting diffused version of the image from the original image and then scaling the brightness of the difference. It can produce distracting artifacts (typically dark donuts around stars) if applied excessively. brightness scaled tracked & stacked image------------same image unsharp masked-------------
7. Acquiring color information To create color CCD image you need to accumulate sets of raw images taken through red, green and blue (RGB) or cyan, magenta and yellow filters (CMY). Because of the infrared sensitivity of a CCD detector, an IR-blocking filter has to be used with each of the above. CMY has an advatage of covering forbidden oxygen and hydrogen beta emission lines around 500nm (major components of the light from emission and planetary nebulas) which are frequently excluded by RGB filters. Also exposures needed to obtain same signal-to-noise ration are shorter with CMY then when using RGB (each of the CMY filters lets through two colors). In addition, using white overlay image (one obtained with IR-blocking filter alone) greatly improves contrast - see Richard Berry's Cookbook site (....................) for detailed discussion of this so called WCMY process. Following examples were taken with my favourite WCMY. Set of raw images taken through each filter is first corrected for dark current and flat field as described above. Each of them is also linear scaled and averaged to assemble three separate master filtered images. master cyan,-------------------------------- magenta and----------- ----------------- yellow images
(linear scaled images are shown) 8. Assembling color CCD image Above CMY images are then converted into virtual red, green and blue frames based on particular filter characteristics (see Cookbook site for discussion of filter calibration and conversion). synthetic red,------------------------------- green and --------------------------------blue images
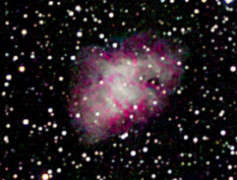
Then, in a final step of WCMY process, color balance of each pixel is calculated by comparing corresponding signals in red, green and blue channels, and resulting 24-bit color information is applied to the white image from step 6. In contrast, when using traditional RGB process, final image is formed by combining color channels. white overlay image----------------------final color image-
* * * True power of CCD imaging comes from the ability to extract important information through image processing. Nothing was added in any of the steps above - all the information in the final color image was already present (in more or less hidden form) in raw frames. To succeed, it is important to remember that CCD imaging (as any astroimaging) is not point-and-shoot activity. It frequently takes more telescope time then traditional film astrophotography - exposures used to assemble the above image of Crab Nebula totaled 112 minutes (not including acquiring dark and flat frames). So if you want to venture into electronic imaging, be warned! But look at the bright side of it - if something goes wrong you will notice it on the computer screen and be able to correct the problem right away. Sure beats realizing a mistake after developing roll of film a month later! And in the end all that frustration with things going wrong in the darkness dissipated with each successful image! Clear sky to you all! Jan Wisniewski |
|